高德地图的2种引入方式
方法一:使用 amap-jsapi-loader 插件
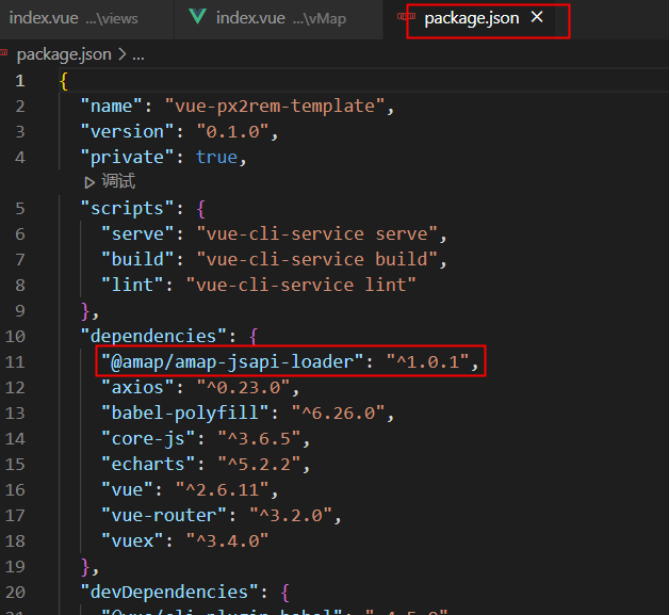
步骤1. npm安装插件 npm install @amap/amap-jsapi-loader --save
步骤2. 创建地图组件
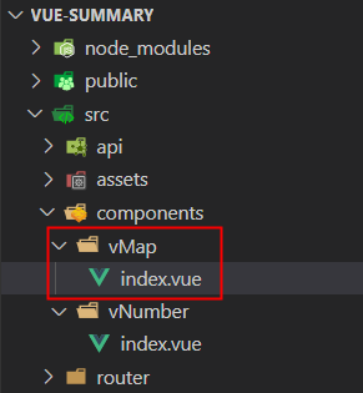
vMap/index页面代码如下:
<template>   <div class="mapContainer" :id="uuid"></div>
</template>
<script> import { uuid } from "@/utils/tools" ;

import AMapLoader from "@amap/amap-jsapi-loader" ;

export  default  {

  data() {

     return  {

      uuid: uuid( 8 ),

      map:  null  ,

      viewMode: "3D" ,

      point:  true  ,

      zoom: 13 ,

      center: [ 114.5895, 38.0073 ],

    };

  },

  created() {

     this  .init();

  },

  methods: {

    init() {

      AMapLoader.load({

        key: "秘钥" ,

        version: "1.4.15" ,

      }).then((AMap) => {

         this .map =  new  AMap.Map( this  .uuid, {

          mapStyle: "amap://styles/blue" ,

          viewMode:  this  .viewMode,

          pitch: 45,  //  俯仰角度
          resizeEnable:  true ,  //  是否监控地图容器尺寸变化
          zooms: [3, 20],  //  设置地图级别范围
          zoom:  this .zoom,  //  初始化地图层级
          zoomEnable:  this .point,  //  是否缩放
          scrollWheel:  this .point,  //  是否支持滚轮缩放
          dragEnable:  this .point,  //  是否支持鼠标拖拽平移
          jogEnable:  true ,  //  是否支持缓动效果
          buildingAnimation:  true ,  //  模块消失是否有动画效果
          center:  this .center,  //  初始化地图中心点
          lang: "zh_cn" ,

        });

      });

    },

  },

}; </script>
<style lang="less" scoped> .mapContainer {

  width: 100% ;

  height: 100% ;

   //  隐藏左下角高德地图logo
  .amap- logo,

  .amap - copyright {

    display: none ! important;

  }

} </style>
注意点:地图组件要有高度,否则无法显示
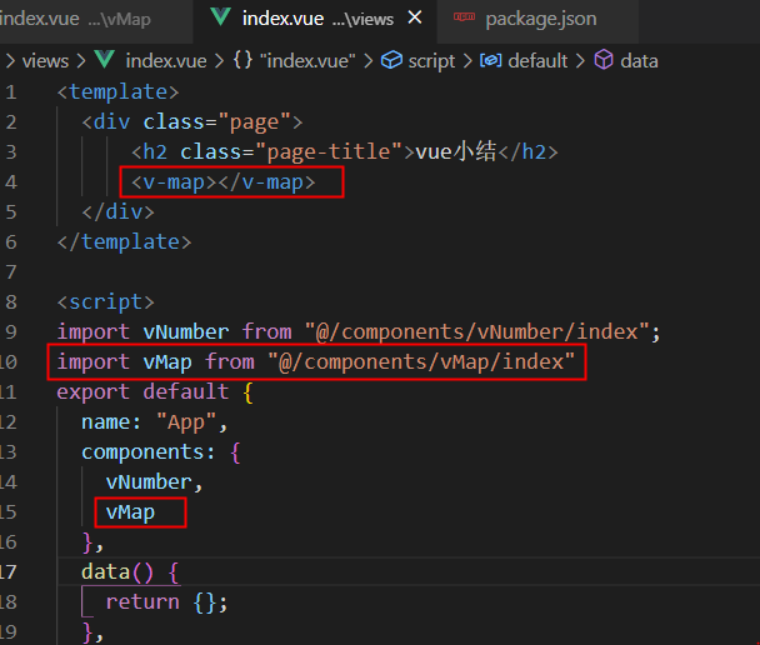
步骤3. 父组件页面使用 vMap 自定义地图组件
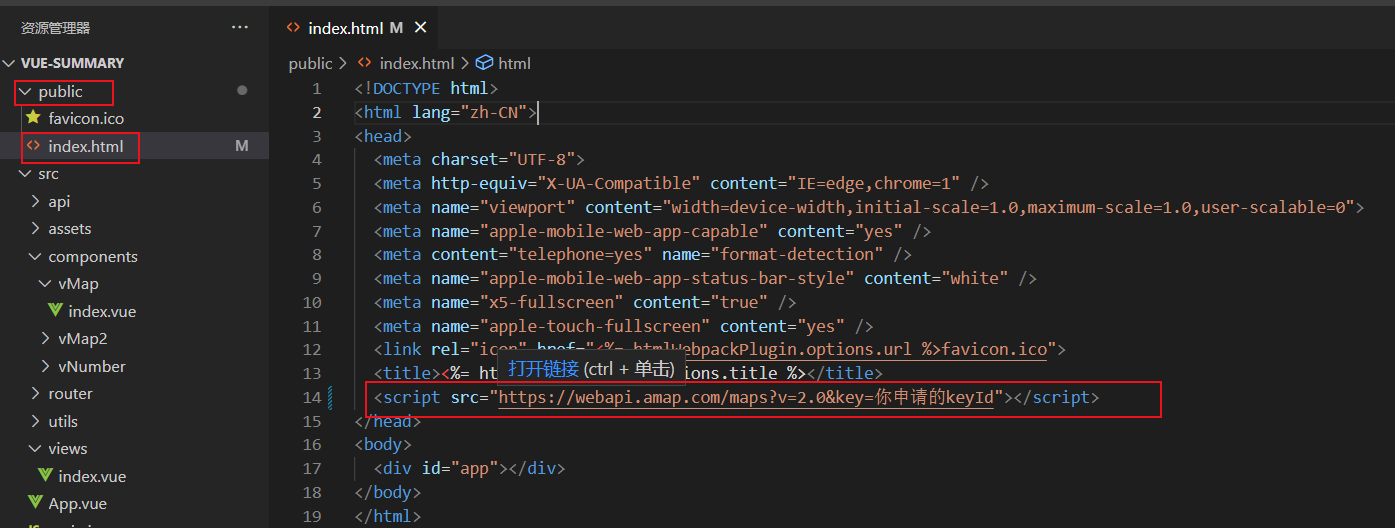
方法二:使用 script 直接引入
步骤1. 在 Public 的 inde.html 文件的 script 中直接引入
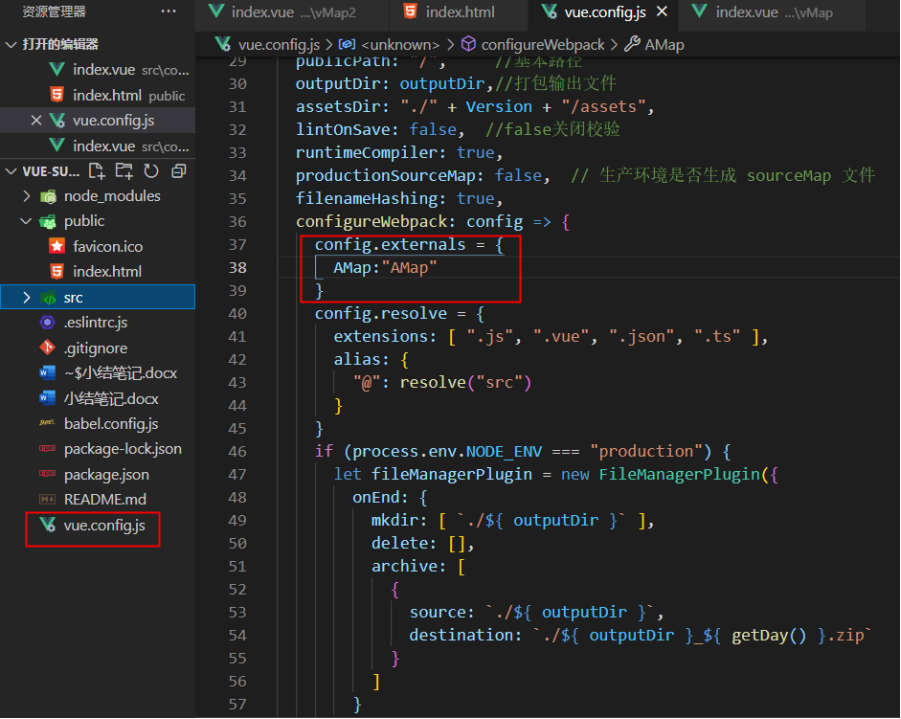
步骤2. 在 config 中配置
 configureWebpack: {

    externals: {

      AMap: "AMap" },

  },
步骤3. 创建自定义地图组件
template>   <div class="mapContainer" :id="uuid"></div>
</template>
<script> import { uuid } from "@/utils/tools" ;

import AMap from "AMap" export  default  {

  data() {

     return  {

      uuid: uuid( 16 ),

      map:  null  ,

      mapMode: "3D" ,

      city: "裕华区" ,

      point:  true  ,

      center:[ 114.5522, 38.0011 ]

    };

  },

  mounted() {

     this  .init();

  },

  computed: {},

  methods: {

    init() {

       this .map =  new  AMap.Map( this  .uuid, {

        mapStyle: "amap://styles/467551ea881c87ff34f6837df70efee6" ,

        viewMode:  this  .mapMode,

        pitch: 45 ,

        resizeEnable:  true ,  //  是否监控地图容器尺寸变化
        zooms: [ 12, 20 ],  //  设置地图级别范围
        zoom: 10,  //  初始化地图层级
        zoomEnable:  this .point,  //  是否缩放
        scrollWheel:  this .point,  //  是否支持滚轮缩放
        dragEnable:  this .point,  //  是否支持鼠标拖拽平移
        jogEnable:  true ,  //  是否支持缓动效果
        buildingAnimation:  true ,  //  模块消失是否有动画效果
        center:  this .center,  //  初始化地图中心点
        lang: "zh_cn"       });

    },

  },

}; </script>
<style lang="less" scoped> .mapContainer {

  width: 100% ;

  height: 100% ;

   //  隐藏左下角高德地图logo
  .amap- logo,

  .amap - copyright {

    display: none ! important;

  }

} </style>
步骤4. 父组件页面使用vMap自定义地图组件
注意: init 方法要放在 mounted 中,不然会提示 Error in created hook: "Error: Map container div not exist" 创建挂钩时出错:“错误:映射容器 div 不存在” , 同样 div 也需要高宽度
附带生成随机id方法:
 /*  *

 * 生成uuid

 * @param len 长度 number

 * @param radix 随机数基数 number

 * @returns { string }  */  export const uuid = (len = 16, radix = 62) => {

  const chars = "0123456789ABCDEFGHIJKLMNOPQRSTUVWXYZabcdefghijklmnopqrstuvwxyz".split("" )

  const uuid = []  if  (len) {  for  (let i = 0; i < len; i++ ) {

      uuid[i] = chars[Math.floor(Math.random() * radix)]

    }

  }  else  {

    let r

    uuid[ 8] = uuid[13] = uuid[18] = uuid[23] = "-" uuid[ 14] = "4"
     for  (let i = 0; i < 36; i++ ) {  if  (! uuid[i]) {

        r = Math.floor(Math.random() * 16 )

        uuid[i] = chars[(i === 19) ? ((r % 4) % 8) + 8 : r]

      }

    }

  }  return  uuid.join("" )

}